
Please wait.
×
![]()
×
.png)
Welcome to Intellbot
Your first AI support assistant has been created. What you need to know:
- Instructions and new knowledge are added in the Knowledge menu.
- The uploaded information is displayed in a convenient card format. After uploading data, you can edit it, and then you must click the "Update" button to apply the knowledge to AI.
- After making changes, you can immediately test the AI assistant in the built-in widget.
- To change the plan or switch languages, go to the Profile menu.
- In the Analytics menu, you can see information about user interactions.
- We have a Telegram channel where you can ask any questions. The link to it is located at the bottom left of the screen.
A new AI Assistant
A new AI assistant
The answers to the questions will allow you to create an instruction manual for the AI assistant so that it is clearly aligned with your goals.Instruction generator
Create a new function
Edit function
Category:
|
|
Assistant Instructions
×
Select InstructionAI Model for AssistantAdd KnowledgeUsing AI, a card with a name and description will be created from the photo. You can add price and other conditions.
An empty card will be created by name. You can add a description and other conditions.
You create a list of hypothetical questions and answers on a specific topic. AI can help generate suitable questions.
The file is uploaded to our cloud and a link to it is created, which the AI assistant can send.
The AI analyzes the HTML page and creates knowledge in the format of a list of questions and answers. Only one specific link can be added at a time.
You can upload 1 file, and the AI assistant will be able to respond based on its content. Supported formats are ppt, pdf, txt, csv, and excel.
Upload 1 sheet of an Excel or CSV file with no more than 300 rows, and the AI assistant will be able to respond based on its content. The content can be updated precisely.
Upload a small document up to 30 pages and 10 MB in DOCX or PDF format, and the AI assistant will be able to respond based on its content. The content can be updated precisely.
Add Product by NameAdd Questions and AnswersAdd by URLProduct
Questions and answersQA
Questions and answersFile
Link:Description:System Instruction for AIAI FormsStep 2: Add FieldsStep 3: Configure Output BlocksReview and SaveFunctions
All
Search
Generation
Math
Assistant ContentYou can use the # wrapper around phrases to add buttons with quick questions. The welcome block supports inserting html code and Markdown.Design
×
Select a Widget Style
Widget IntegrationFullscreen IntegrationTelegram IntegrationWhatsapp Integration
Available for the 'Small' plan and above.API endpoint
Available for the 'Medium' plan and above.API Request ExamplesVoices for AI Assistant
Available for the 'Small' plan and above. |
|
|
|
|
Message ListEngagement MetricsUsed CreditsYou have reached limit of gpt-4o-mini model requests. Add credits to continue working with the Assistant. You have reached limit of gpt-4 model requests. Add credits to continue working with the Assistant.
You can't buy credits at this time. But if you need more or have your own access to the OpenAI API you can contact us at support@intellbot.ai to expand your options.
GPT-4o-mini
$
GPT-4-turbo
$
Knowledge ListEdit Knowledge
...
...
Used MemoryThis is a monitor where you can see the available memory for storing information. For every 1KB of clean data you add, a vector database needs 60KB on average. This is because a vector index is created and metadata is added to the added text. The data for AI assistants is stored in RAM. |
|
|
Quick StartWelcome to Intellbot. It is a platform for developing business assistants based on artificial intelligence.
We distinguish three scenarios when business assistants may be needed:
Step 0: Try the assistantTake a look at the screen. On the bottom right you see a beautiful widget. This is your first assistant. It is not yet set up, but you can already communicate with it. →Step 1: SettingsAll main settings of your AI assistant are made in the "Setup" menu. – Assistant Settings:Add or update scenarios and instructions that your assistant will follow. You can write the instruction yourself or use the instruction generator. In this section, you can also select the AI model that will be used by your assistant. We currently use two of the best models in the world: GPT-4o-mini and GPT-4o. The choice of models will expand in the future. 
– Functions:Connect additional functions to the assistant. You can use ready-made solutions or write your own Python function. – Content:Update descriptions and greeting messages to match the tone and style of your brand's communication. This setting applies only in the case when you are using a widget or fullscreen mode. 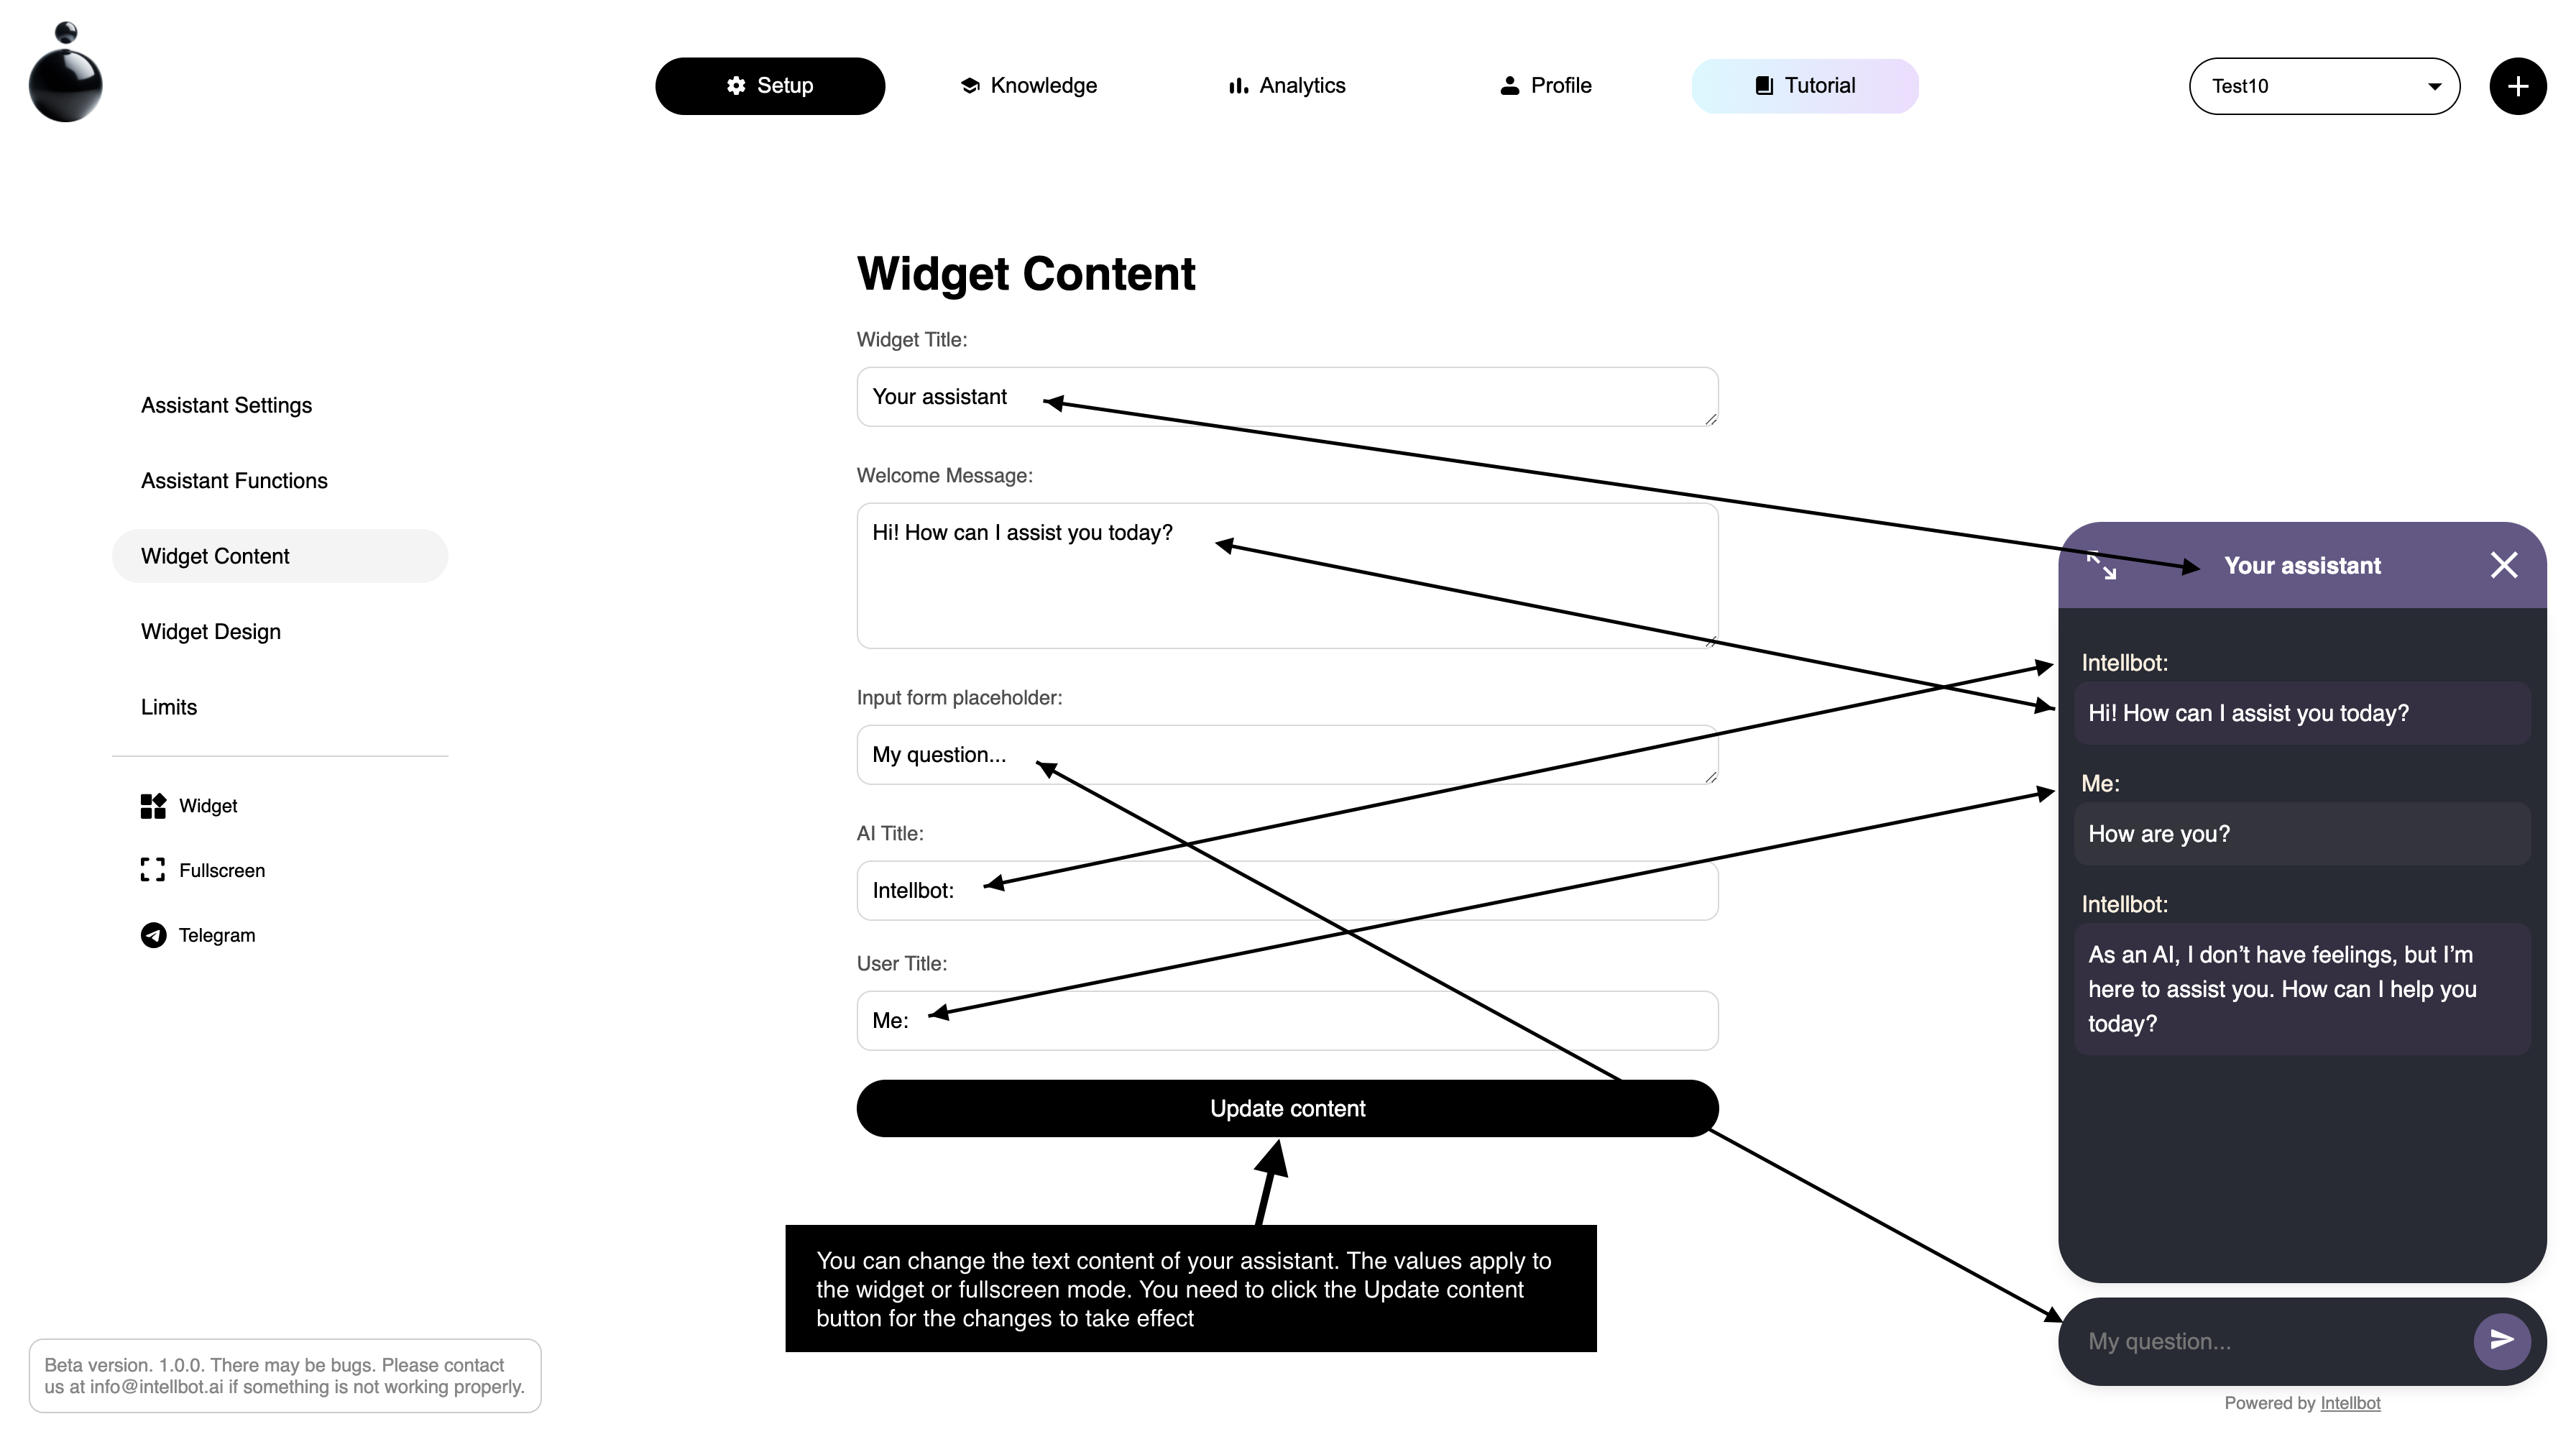
– Design:Customize the appearance of your widget by choosing colors and elements that match your brand and style. You can choose ready-made solutions or customize the visual style yourself. 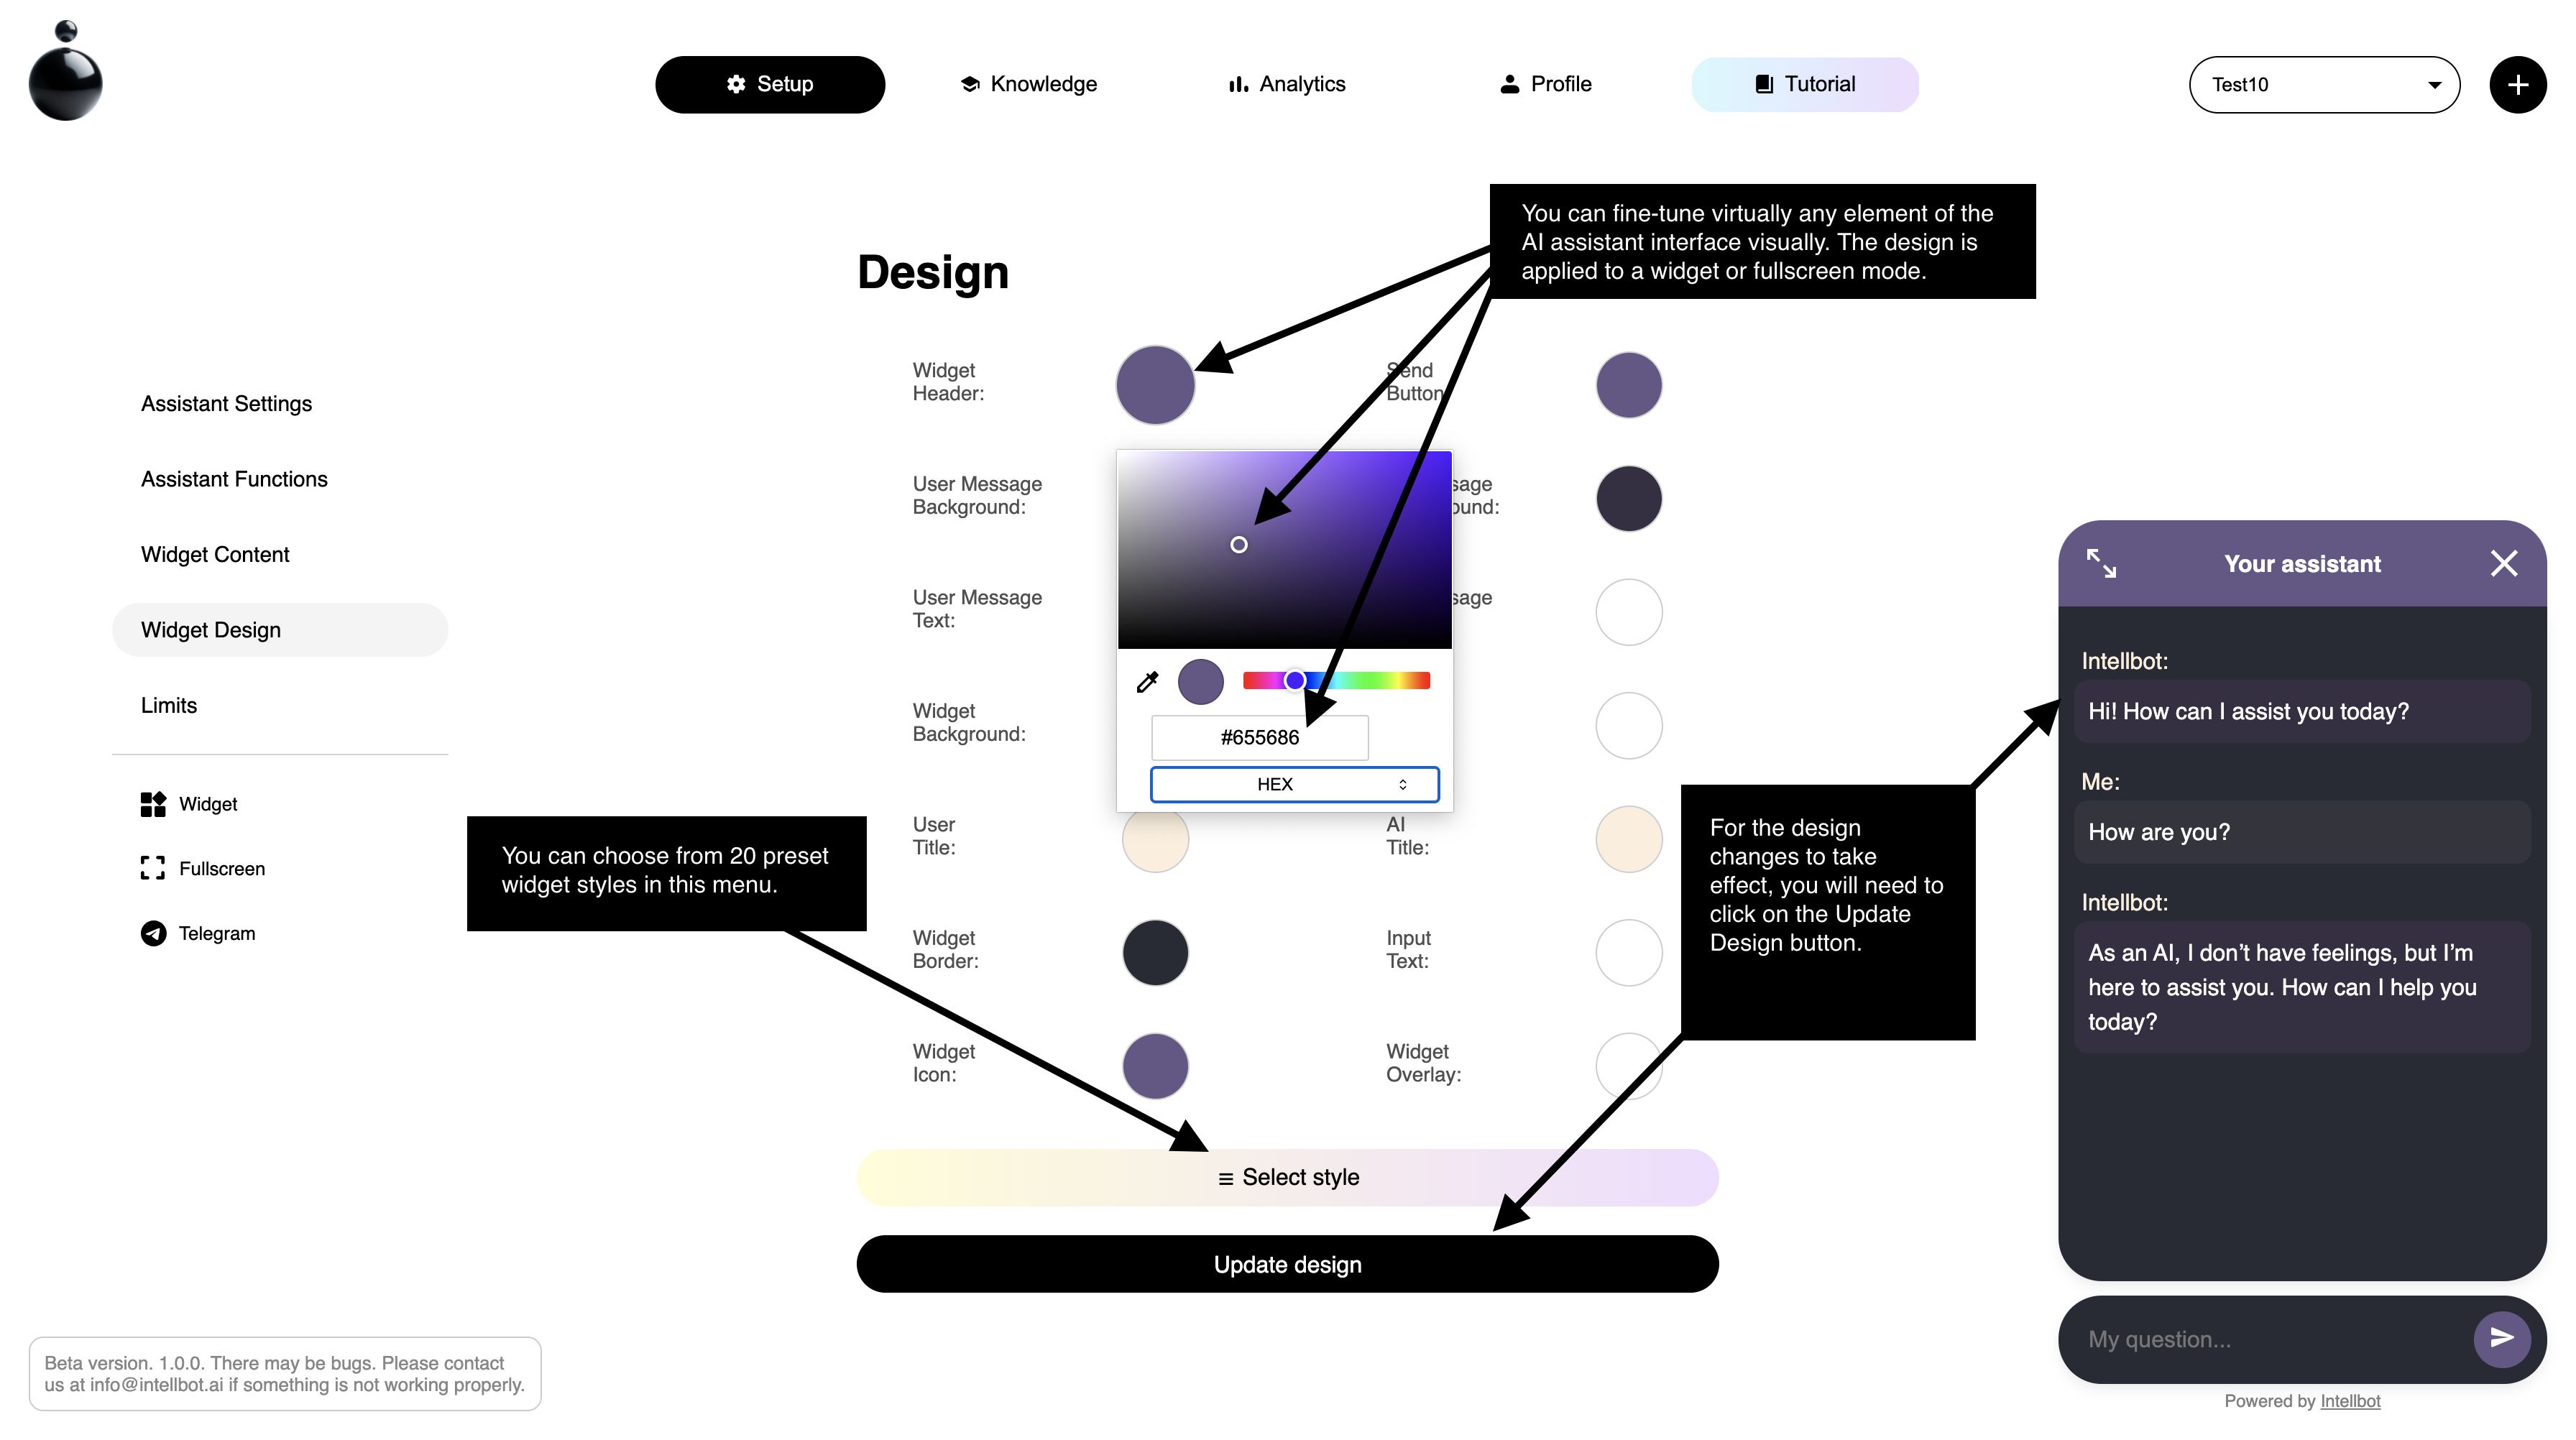

Step 2: AI KnowledgeGo to the "Knowledge" menu and add corporate information that will be used by your AI assistant in communication with users. You can supplement knowledge with "question/answer" pairs or insert a link to your site in the appropriate field, after which the service will update the Assistant's knowledge based on the information on the specific page. 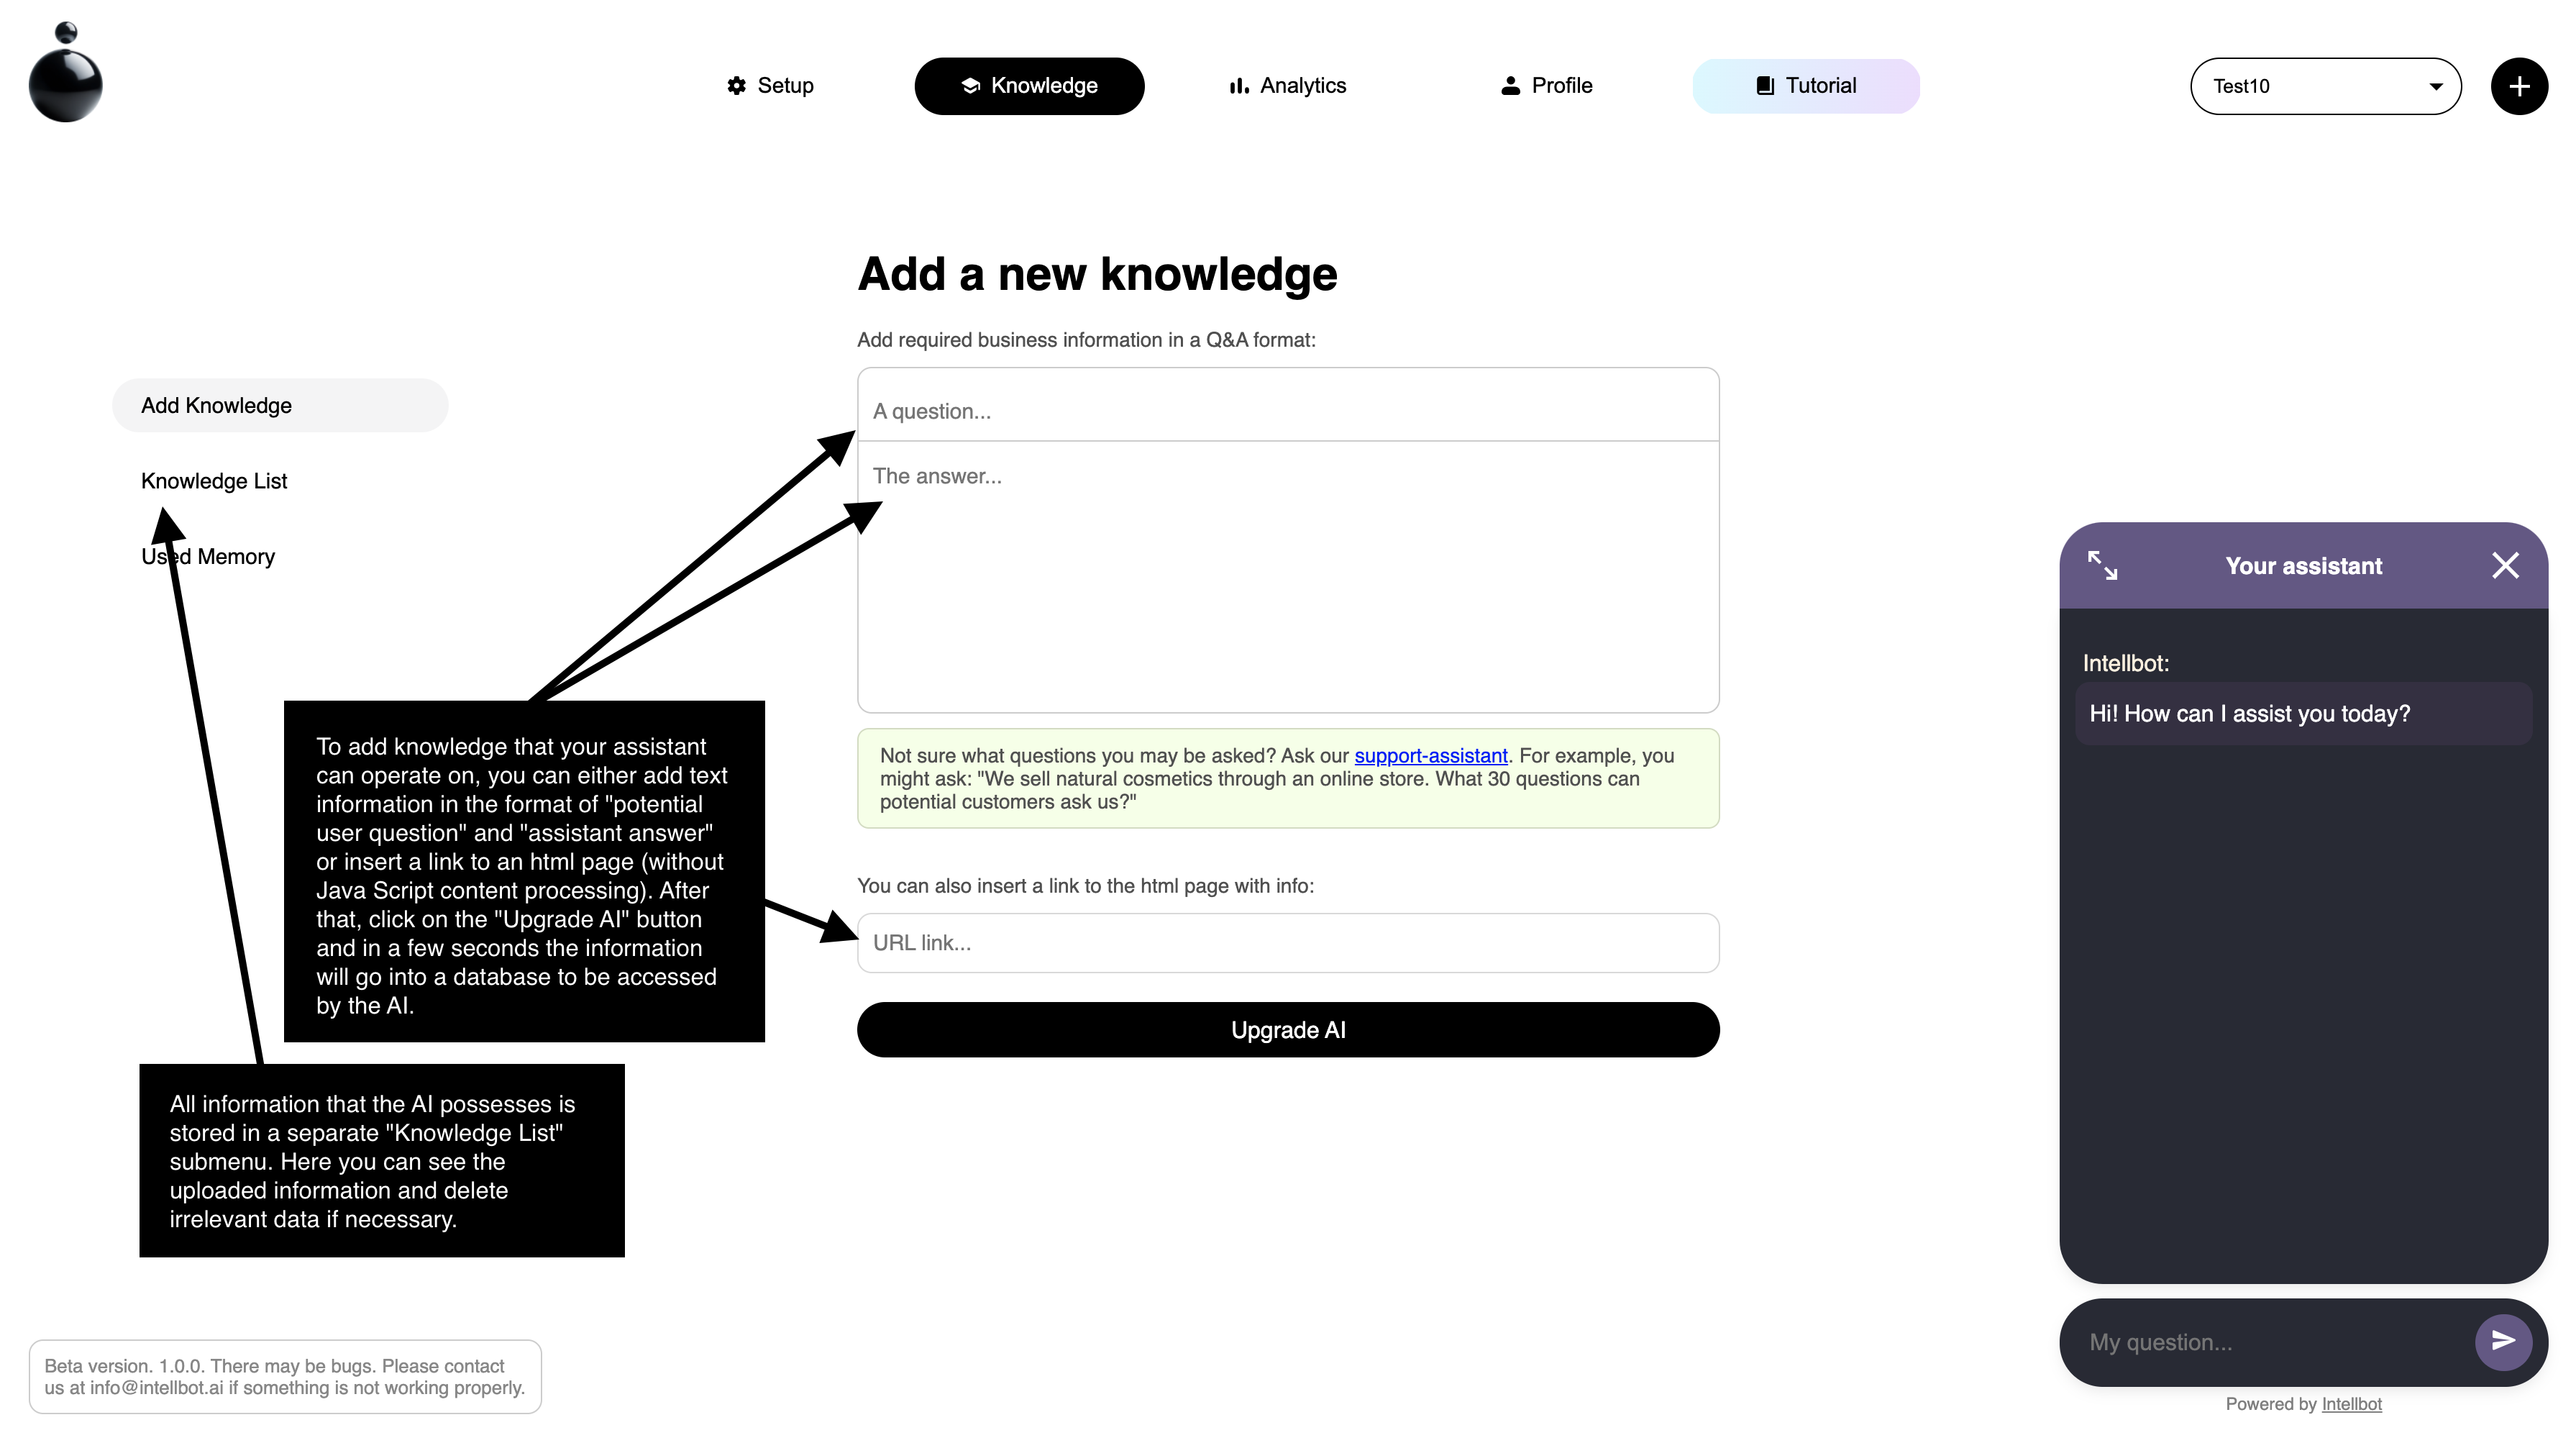
Step 3: AnalyticsUse the "Analytics" tab to track user messages and assistant responses. The result of the communications is analyzed for intonation, mention of certain goods and categories of messages. You can also see the frequency of communications with your assistant in this section. In the future, we will add more analytical capabilities. Step 4: Testing and integrationAfter each update, function or knowledge addition, check the assistant's performance. Once you realize that your assistant is ready you can integrate it into your website as a widget, into Telegram as a bot or into Slack. Integration takes minutes. On the Setup page, you need to copy the code of a suitable integration and paste it into your resource. That's all. Remember to save changes after each setup step and conduct tests to ensure the correct operation of the assistant. Now your AI assistant is ready to help you and your clients! Instruction and modelInstruction
Instruction is needed to ensure that the AI assistant understands his/her job responsibilities. For example, you can specify:
Etc. To improve the quality of your answers, you can add examples of how the Assistant should answer if you need to support certain specifics in the instructions. If you have difficulty creating the instructions yourself, you can use the AI to help you create them. To do this, click on the "GENERATE INSTRUCTION WITH AI" button. 
In the form answer the questions it asks in order and you'll be all set. 
After you write or generate the instruction you should click on the "APPLY INSTRUCTION" button. AI ModelIn the intellbot platform, you can select the artificial intelligence model to be used by your assistant. Currently, you can choose from two models: GPT-4o-mini and GPT-4o. GPT-4o-mini is faster at processing responses and is suitable for most tasks related to user support or routine tasks. GPT-4o is the most advanced AI model. It has a fairly high response generation rate and is capable of analytical and critical thinking. With this model, you can create Assistants that act as professional advisors where analytical approach and solving non-standard tasks are required. Please note that the cost of using the models differs.You can choose any of these models and change them in the process of using the Assistant by simply clicking on the block below the form of adding instructions. The model is updated automatically within a few seconds. 
Limit managementOn the limits tab you will see statistics and data about the number of your tokens on your balance and the possibility to purchase them. 
1 credit = 1 query + 1 response from AI assistant + 1 background analysis of the Q&A session. After registration, 100 free credits for the GPT 3.5 turbo model and 50 free credits for the GPT 4.5 turbo model are available for all users to test the assistants. Depending on how many requests your assistant is going to handle, you can purchase the corresponding number of Credits in the purchase window. Cost of useGPT-4o-mini $10 = 200 Credits GPT-4o $10 = 100 Credits You can buy any number of credits, but not less than $10. Enter the values required for the desired model and click on the "BUY" button. The statistics at the top of the page will update and you will see the current balance information. NOTE 1. During the service testing period the payment module may not be available. If you need to purchase more credits, please write to support@intellbot.ai NOTE 2. Email us at support@intellbot.ai if you have an OpenAI account and your own personal access to the API. In this case, we will be ready to provide you with another way to use the Intellbot platform.Adding knowledge
On the Knowledge tab, you can perform the following tasks: 1. Add knowledge to the assistant.You can add knowledge in a question and answer format. If you have difficulties with composing questions you can use a support assistant who can help you come up with them. You can also insert a link to a website page from which all textual information will be learnt. (It is important to realize that it is not the whole site but a specific page that will be studied). If you have corporate documents (product presentations, regulations, tables with the list of products and services) you can upload them too. The Intellbot supports a .txt, .pdf, .pptx, .docx, xlsx, .csv data files. 
2. View existing knowledge "Knowledge List".In this tab you can see all the knowledge your assistant has. If necessary, they can be deleted for further adjustment. 
3. View the amount of used memory.In this tab you can see the amount of used and remaining memory of your assistant. If necessary, it can be increased. To do this, write to the support team at support@intellbot.ai. 
Connecting functionsSystem Functions.
On the Assistant Functions tab, you will see a list of all the basic functions available:
Etc. These functions show only some of the features of the Assistants. We will add more functions over time. If you have any specific suggestions, please email us at support@intellbot.ai Setting and activating functions.On each function you can see the Pencil icon - it allows you to edit the function. There are three parts to setting a function:

Custom Functions.You can create your own function. There are currently two types: Direct Answer and Custom Function. In the first case you set conditions for the assistant to give out specific information in a particular situation, in the second case you can program your own unique solution using Python scripts. 

In order for your Assistant to start using the function while performing its tasks, you need to be sure to activate it. 
Widget integrationOn the Widget integration tab, you will see the generated code with the assistant you configured. You can open your html page where will integrate and copy-paste the code. Any further changes to the assistant do not require re-integration. 
Fullscreen integrationOn the Fullscreen Integration tab, you will see the generated code with the assistant you configured to integrate into the site as a fullscreen assistant. Copy-paste the code into your html web page. Any further changes to the assistant do not require re-integration. 
If you don't have your own website where you can embed the Assistant, use intern link. You can use it to interact with the Assistant and share with colleagues or friends. 
Telegram integrationIntegration with Telegram is very simple and will take you a few minutes. Below is a step-by-step guide. 1. Create a Telegram bot where will to work your Assistant.Go to Telegram https://t.me/BotFather to create a new bot. Next, select the /newbot command in the interface. You will be prompted to select a custom bot name and a system bot name that you can use to send a link to it. Finally, after these steps, you will receive a notification that the bot was successfully created and your API KEY number that you need to copy and paste into Intellbot. 
2. Insert API KEY and connect Assistant to Telegram.
That's it. Now you can go to your Telegram bot and press /start or just write something. Now you can interact with the Assistant in Telegram. 
Analyzing data |

|
|
User InfoAssistantsPlanSupportInterface languageThe interface language is localized using artificial intelligence. If you see a typo, error or contradiction somewhere, please write to us at info@intellbot.io and we will correct the translation.
🇺🇸
English
🇷🇺
Russian
🇪🇸
Spanish
🇵🇹
Portuguese
🇫🇷
French
🇩🇪
German
Employees |